theTRUTH
Moderator: DLRA
Re: theTRUTH
The terraplane with the 400 small block chev used a 50l water tank (beer keg) it worked fine. 70 degrees c at the end of a 3 mile run. And almost 90 after a second run with about 2 hrs cool down time. In saying that with our new motor we've installed a second 100l tank mostly for balast and linked them both. We also used red line water wetter. I should update our build diary.
"On the sea that's aquaplaning, in the air that's aeroplaning, but on the land, in the traffic, on the hills, hot diggity dog, THAT'S TERRAPLANING"
-
russelllowe
- Posts: 252
- Joined: Mon Jan 06, 2014 2:21 pm
- Contact:
Re: theTRUTH
Thanks Gus, good to have some numbers ... the small tank in the front of my bike is about 36l. I recon I could get it up to 50l by extending it a little further down the spine ... with everything out in the breeze, and less weight to shove along, it sounds like that should be enough.
Love the Terraplane by the way. I grew up around 30's Mopar's, so have a fondness for those shapes. My old man still has a 1936 Chrysler Cabriolet ... not sure he'd be thrilled at the idea of me land speed racing it though.
Cheers!
Love the Terraplane by the way. I grew up around 30's Mopar's, so have a fondness for those shapes. My old man still has a 1936 Chrysler Cabriolet ... not sure he'd be thrilled at the idea of me land speed racing it though.
Cheers!
-
russelllowe
- Posts: 252
- Joined: Mon Jan 06, 2014 2:21 pm
- Contact:
Re: theTRUTH
Hi Simpleterm, cool, will post video when there is more to see. I think I'll buy the tube for the frame later this week, so that will get things moving.
I recon I'll have about 20k in parts and materials in it by the time I'm done. About half that is in the motor and electronics. Probably less than 500hrs in build time I recon ... I'm saving a bunch of time by using donor bikes for the front and rear ends.
Hi Chris, good to hear. Time to shop for a short belt.
Cheers
-
simpleterm

- Posts: 15
- Joined: Sun Sep 10, 2017 12:14 am
Re: theTRUTH
Woah, that's a lot of money and a lot of time spent into the the project. But it's worth it, I'm sure! Good luck, can't wait to see the video!russelllowe wrote: ↑Mon Sep 11, 2017 11:19 am Hi Simpleterm, cool, will post video when there is more to see. I think I'll buy the tube for the frame later this week, so that will get things moving.
I recon I'll have about 20k in parts and materials in it by the time I'm done. About half that is in the motor and electronics. Probably less than 500hrs in build time I recon ... I'm saving a bunch of time by using donor bikes for the front and rear ends.
Hi Chris, good to hear. Time to shop for a short belt.
Cheers
Re: theTRUTH
One of the good things about LSR is that you can choose and run in a class that suits your budget,,budget?, what budget?, wish I could stay within mine 

First Australian to ride a motorcycle over 200mph at Bonneville,,,
-
russelllowe
- Posts: 252
- Joined: Mon Jan 06, 2014 2:21 pm
- Contact:
Re: theTRUTH
Hi Simpleterm, for the speeds I'm attempting it's actually not much of either. I had about 10k (all up, including getting to the salt) and 500hrs into last years bike and did 195mph. My mate Paul did 185mph on about 6k all up. I blew my motor in the process, but Paul's Blackbird is rock solid! I'm seeing this years bike as a base to build on over the next few years which means the costs next year should be a little less. Surprisingly V8 bikes haven't gone that fast in the past, I'm hoping to change that ...
Stayt'ie, did you like that bit where I said "... which means the costs next year should be a little less"? I knew that was a lie as soon as I typed it ... Hahahaha.
Have to keep in mind all the prize money and international fame and glory though.
Cheers
Stayt'ie, did you like that bit where I said "... which means the costs next year should be a little less"? I knew that was a lie as soon as I typed it ... Hahahaha.
Have to keep in mind all the prize money and international fame and glory though.
Cheers
Re: theTRUTH
Yup ,, You raise a cuppla valid points, with doing the resurch, putting it out there for all to comment on, not cutting corners, and trying to get it right first time,, by doing this, hopefully it will be a little cheaper next time out 
First Australian to ride a motorcycle over 200mph at Bonneville,,,
-
simpleterm
- Posts: 15
- Joined: Sun Sep 10, 2017 12:14 am
Re: theTRUTH
Well, it may not be cheaper next year, but you could save some money because the next year you won't repeat the mistakes you did this year. Experience is what's important, that's my opinion 
-
Hoofhearted
- Posts: 62
- Joined: Wed Nov 25, 2009 5:55 pm
- Location: Riverside, SoCal
Re: theTRUTH
I'm sorry to see you have decided to go head first. But its your build not mine. Good luck with it. I'll keep following to see how it turns out.
Don't cry because its over. Smile because it happened.
-
russelllowe
- Posts: 252
- Joined: Mon Jan 06, 2014 2:21 pm
- Contact:
Re: theTRUTH
Hi Hoofhearted, yeah, I'll cut the front off and redo the front and rear ends when I feel comfortable with it over 200 ... feet forward is the way to go really fast, I'm still convinced of that.
I picked up the JackShaft components on the weekend. The shaft looks beefier than I was thinking it would, probably because it's so short. Anyway, here are the components:
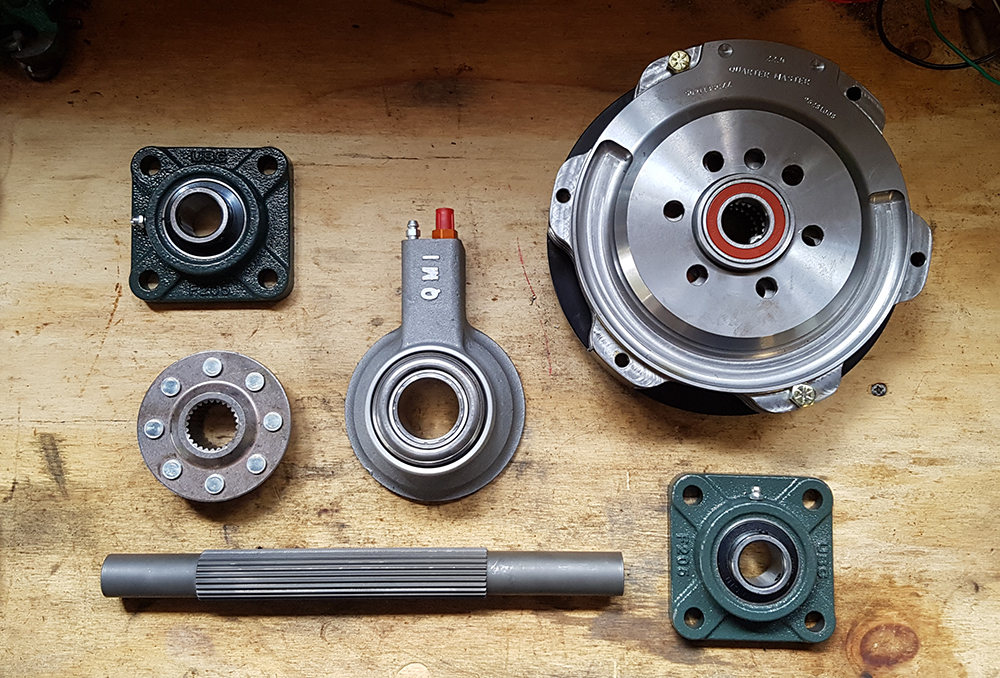
I've since punched out the drive sprocket rivets ... you might notice the holes on the flywheel "button" (their term for it) are not equally spaced, and on a smaller radius than the LS3 crank as it turns out too. Not what I ordered, but not really an issue.
Here it is all slipped together:
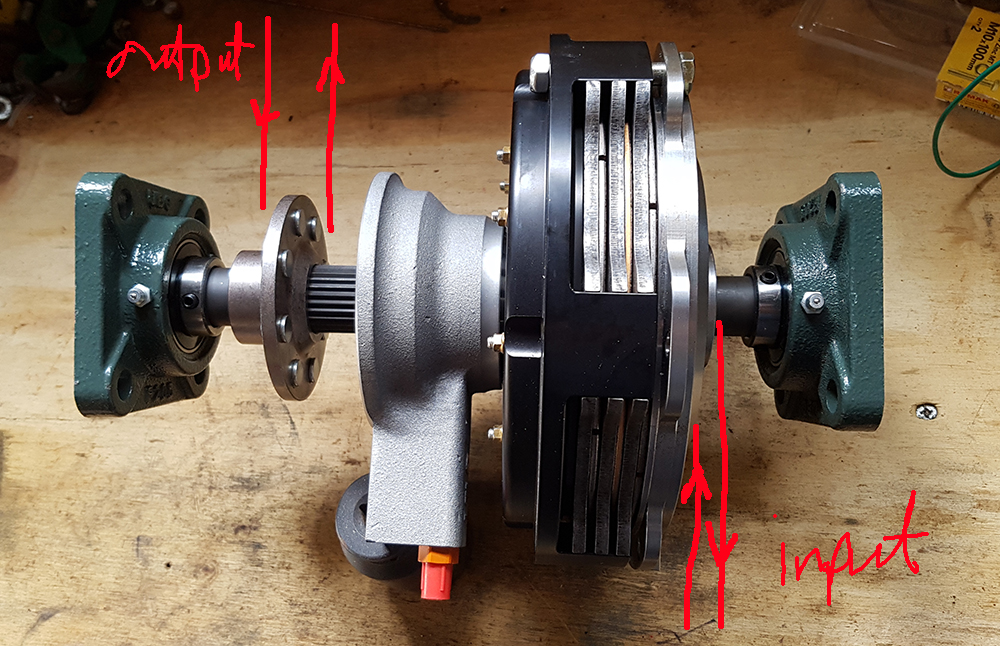
Not shown are the input and output sprockets. I'll need to get some blanks and drill them to suit. Distance between them is 175mm (so drive is all down the left hand side)... 175mm is a little bigger than I originally calculated as I changed my mind and went back to a conventional starting system off the ring gear (after I gave the drawings to the engineer) ... just to make the start line procedure a little easier.
Also missing is the backing plate to resist the force of the clutch release bearing. The Quarter Master unit doesn't have any tabs or mounting holes anywhere, so it must slot into a typical gearbox housing somehow ... I'll need to keep it centered somehow too.
Hopefully get the tube this week. Failed on that last week. I did order the ECU stuff the other day though. Looking forward to that showing up.
Cheers!
I picked up the JackShaft components on the weekend. The shaft looks beefier than I was thinking it would, probably because it's so short. Anyway, here are the components:
I've since punched out the drive sprocket rivets ... you might notice the holes on the flywheel "button" (their term for it) are not equally spaced, and on a smaller radius than the LS3 crank as it turns out too. Not what I ordered, but not really an issue.
Here it is all slipped together:
Not shown are the input and output sprockets. I'll need to get some blanks and drill them to suit. Distance between them is 175mm (so drive is all down the left hand side)... 175mm is a little bigger than I originally calculated as I changed my mind and went back to a conventional starting system off the ring gear (after I gave the drawings to the engineer) ... just to make the start line procedure a little easier.
Also missing is the backing plate to resist the force of the clutch release bearing. The Quarter Master unit doesn't have any tabs or mounting holes anywhere, so it must slot into a typical gearbox housing somehow ... I'll need to keep it centered somehow too.
Hopefully get the tube this week. Failed on that last week. I did order the ECU stuff the other day though. Looking forward to that showing up.
Cheers!
Re: theTRUTH
Looks impressive in the flesh. Looking for the weak link if any I would carry spare bearings perhaps, bit unknown in this application. Apart for that it looks tough.
Chris
Chris
Chris
-
walkingpace

- Posts: 88
- Joined: Mon Jun 04, 2012 11:19 am
- Location: Central Coast NSW
Re: theTRUTH
Love the look of the jackshaft. Is the collar for the output sprocket a centre from a clutch disc? and also how is it located on the shaft to stop it wandering sideways?
-
russelllowe
- Posts: 252
- Joined: Mon Jan 06, 2014 2:21 pm
- Contact:
Re: theTRUTH
Thanks Chris, yes, I think you're right re taking extra bearings. Cheap insurance.
Cheers Walkingpace, yup ... out of the center of the clutch that came with the motor. Figured it would be up to the challenge! At least at stage 1. That one is a pretty tight fit up that end of the spline ... the other 3 clutch plates all slip over the spline with little resistance. I can put a spacer to stop it wandering to the right, but other than drilling it and putting in a grub screw there is not much I can do to stop it wandering to the left. I could weld a lip on it I suppose?
Cheers
-
Greg Watters

- Posts: 760
- Joined: Mon Sep 27, 2004 8:57 pm
Re: theTRUTH
Are you relying on the bearing lockring to take the clutch thrust ? i think you will need something more positive
Nice clutch assembly
Nice clutch assembly
-
russelllowe
- Posts: 252
- Joined: Mon Jan 06, 2014 2:21 pm
- Contact:
Re: theTRUTH
Hi Greg, ummm ... took me a moment to figure out what you were talking about ... I'd been thinking about supporting behind the thrust bearing and hadn't considered what would happen at the other end (i.e. stopping the clutch itself from simply pushing away).
With all its hardening I don't think machining the shaft is an option, maybe some kind of collet system (like you see on mill's to hold the bits in the chuck) might work? Would need a thrust bearing too.
Do you have any ideas?
Cheers
With all its hardening I don't think machining the shaft is an option, maybe some kind of collet system (like you see on mill's to hold the bits in the chuck) might work? Would need a thrust bearing too.
Do you have any ideas?
Cheers