Scary stuff indeed Chris and Ronnie that may have not been far enough Seen 2 flywheel explosions
one went off like a bomb and cut outwards in all directions no big bits just 360 degree buckshot
second was several big bits one landing from great height in the rearmost pits at a drag meet several hundred meters away, between cars and exiting at great speed through the rear wall, several spectators injured, this was through a blanket... the approval tag readable in the red mark on my mates thigh (Just reread first page, this was the one Bones saw too)
C Hanlon wrote:Rob Peter Perkins and Chris ? turned up with a front drive Astra this year and spent many many hours making an external scattershield only to find out its not required on front drive.
Is this true? and does the same apply to rear engined, rear drive?
Just when you thought you were almost on top of it!! Even though the risk to anyone would be negligible if your flywheel let go the requirement is in the rules and it would be a great shame to fail scrutineering and not get to race because of it, especially after all the effort you've put in already. I think you have two options:
1) Looking at my 1200 engine and tunnel case for inspiration, which I know isn't exactly the same as your setup, the scattershield's going to be very oddly shaped and made of many pieces but at least you have the 4 main bolts and the starter motor stud to mount it on. Better get some longer bolts. If needs be, you could also attach it to the back bolt under the sump. I'd make it go well past the line between the engine and gearbox and as close to the case as possible. The tinware for #3 cylinder is very close but you could go to the pushrod tube for #1 on the other side. I'd also have extra plates coming forward as close to the gearbox side plates as possible to increase the area safely covered, perhaps incorporating them with a short concave circular section that went between the starter motor and the gearbox case. A few welded-on vertical reinforcing ribs in 1/4" steel where you can fit them (on top of the motor along the split line and forward to where the case levels off) would also add a lot of strength. Obviously, you'll need a cutout for the clutch lever. There may be some interference between the big lower bolt on #1 side and the side plate studs. Make absolutely sure you can fit it over the side plates before the half shafts go on. If not, it may have to be made in pieces and bolted together in situ, which is getting too complicated.
2) Just looking now at some of the photos from your build diary you might be better off bolting a plate to the underside of the frame horns that support the engine and gearbox. That would mean less interference in an already busy area and for the top you might even miss the bodywork if you're careful. Make it in two pieces and bolt it to the frame horns, with adaptor brackets if necessary. This option is much easier and if it provides full coverage of the flywheel area it'd be my choice.
Given that it is only a cover and not actually a bellhousing replacement you don't need it to be perfectly accurate, just able to contain angry shrapnel. If you bolt it to the engine as well, make the bolt holes just a little oversize so there's some jiggling room. You should invest in a steel flywheel to minimise the risk. I think they're supposed to be compulsory anyway.
Design it tonight, start making it tomorrow! Good luck.
I had a billet flywheel specially made to take the Porsche clutch - this is a bit of an odd setup as the ring gear bolts to the flywheel and is not shrunk on in an interference fit like a normal flywheel.
The clutch is a stock Porsche 911 unit, but is a pretty heavy duty bit of kit - the pressure plate assembly is an all steel unit not the aluminium unit that some use
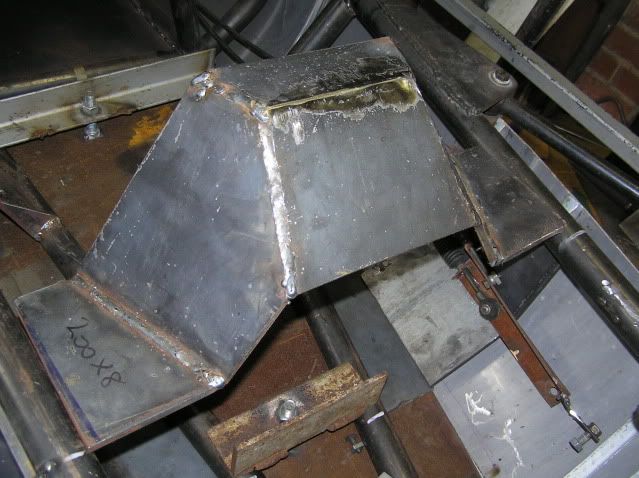
That looks about right, looks easy too. I'd just extend the top plate down towards the diff centre to deflect errant bits of ring gear away from you. A bit more coverage never hurts.
That top piece looks like a lot of unecessary work, I can't see why it couldn't be made from 6mmx150mm flat in less time with less work.
Bends instead of cut, dress and weld.
More fab time = more safety in this case, a worthwhile trade I'm thinking.
My oxy cutting used to look like a rat chewed the edge9s) until I was shown the correct method to set up the torch by a boiler maker. Now they come out close to plasma assuming I get it right. I was shown the previous method by a welding teacher, go figure.
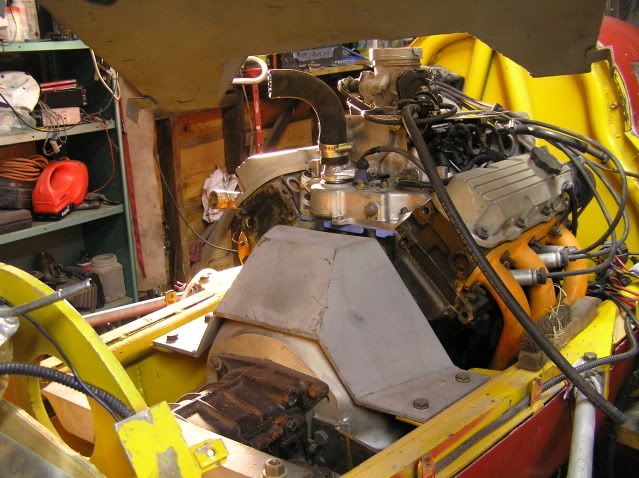
Here is ours in place during construction...just for the record the pieces of angle underneath were holding the floor plate up before it was fastened properly...
,
In this shot you can see how it fits over the bellhousing, in the top of the shot is the water tank and you can see how it has a cut out that matches the scattershield....there's six layers of 3mm plate in the various levels in the water tank...the scattershield is 6mm, there's 8mm down the sides and 6mm plate across the floor which you can see in the shot above...
...few understand what I'm trying to do , but they vastly outnumber those who understand why..


 ,
,