Hey Harky,
The thing about race car wings ... F1, Supecar, Touring car ... is that they need to work at a range of speeds. There has been some cool #cheating in F1 where the mount for the rear wing was made weak so that it flexed (altering the angle of attack) and created less downforce/drag at high speed (they weren't supposed to have adjustable aero). But it shows that the static design was weighted towards low speed downforce.
My wing also needs to work across a range, but it's from 180mph, where I think I'm starting to loose traction and 220mph, where I recon I will definitely be challenged.
I like glider wing design as a precedent because they don't have a motor, so simultaneously can't tolerate drag and need something to lift them up. They seem to be thin and long.
Some info here on the effect of winglets and the overall shape: https://jonkersailplanes.co.za/aerodynamics/
Would be good to cut the back off one of these sailplanes and smash it up the back of theTRUTH ...
Cheers
theTRUTH
Moderator: DLRA
-
russelllowe
- Posts: 252
- Joined: Mon Jan 06, 2014 2:21 pm
- Contact:
-
russelllowe
- Posts: 252
- Joined: Mon Jan 06, 2014 2:21 pm
- Contact:
Re: theTRUTH
Hi All
Another question for ya ... I've found a supplier of LSR tires in Adelaide, but now I'm struggling to find a wheel rim to suit ...
For the D2870, which is rated to 320mph, I can use a rim between 5.5” – 7.5” wide. But the sticking point is that it needs to be 18" in diameter.
I've found a 18x6.5 steel wheel for a snow tire in Canada ... but what are people using locally?
Any ideas?
Anyone using the D2870?
Cheers!
Re: theTRUTH
Try Adelaide Wheels and Rims 08 83526266

Re: theTRUTH
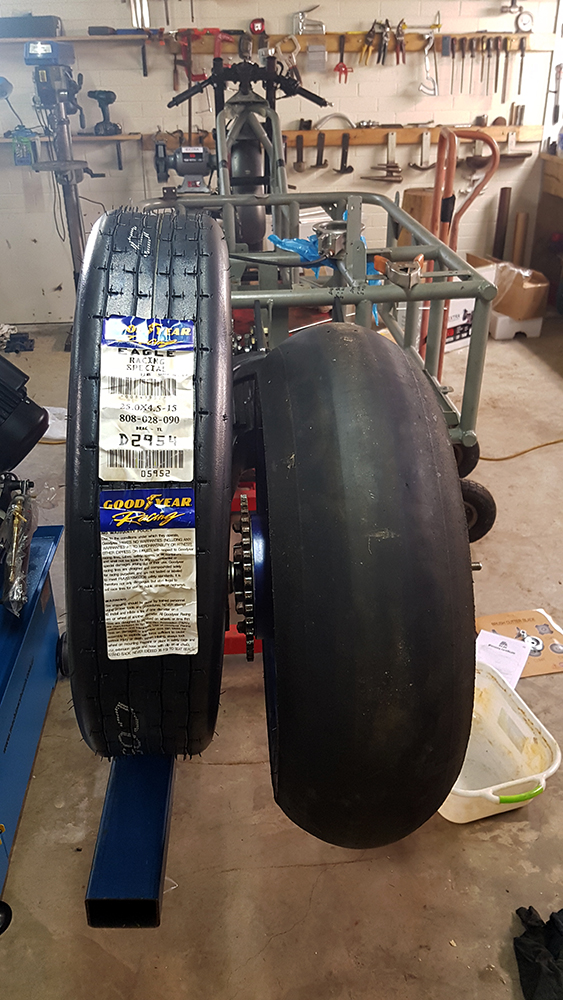
Hi Russ, the D2954 is what I've been using for years with no issues. It fits to a 15" rim which opens your options and the OD is same as hayabusa which means your ratios will be OK. These tyres do grow by up to 2" at speed even when pumped to 100 psi.
The guys at North Terrace Tyres are good to deal with
The guys at North Terrace Tyres are good to deal with
AA licenced
1st open bike in the world over 260mph - both ways
Red hats = DLRA, SCTA, BUB
1st open bike in the world over 260mph - both ways
Red hats = DLRA, SCTA, BUB
-
russelllowe
- Posts: 252
- Joined: Mon Jan 06, 2014 2:21 pm
- Contact:
Re: theTRUTH
Hi Jason, thanks but I think I've found something a little closer to home (Sydney/Newcastle area).
Hi Richard, that tipped the balance ... I ordered a D2954 today ... do you mean 2" in diameter or radius? With a 140 link chain I have about 1" clearance between the tire and the swingarm (just thinking that in all other dimensions it's actually smaller that the current 190x55x17 slick that I have on there at the moment, so could use the same setup).
By the way, do you use a CTM Muscle "Burnout" wheel? I came across them while looking for skinny 15" wheels and thought it looked similar...
Cheers
-
russelllowe
- Posts: 252
- Joined: Mon Jan 06, 2014 2:21 pm
- Contact:
Re: theTRUTH
Hi Guys,
Big day! Got my first LSR tire ... time to get serious!
Will be a little skinnier than the 17" slick but with a greater contact patch ... might help with traction ... and definitely cope with the extra load from the wing.
Thinking of using a 15 x 5" US Mags wheel on a custom made hub, like this:
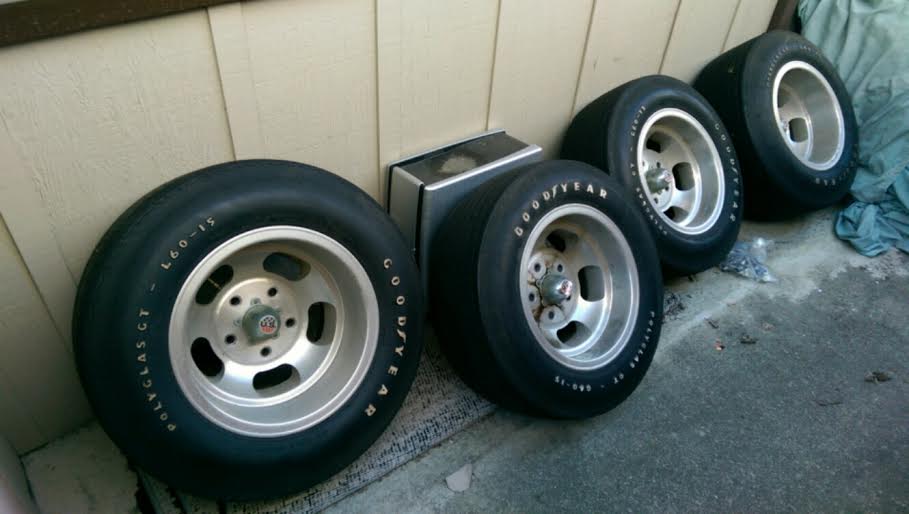
Going for that old school hot rod look, seems appropriate.
Cheers!
Big day! Got my first LSR tire ... time to get serious!
Will be a little skinnier than the 17" slick but with a greater contact patch ... might help with traction ... and definitely cope with the extra load from the wing.
Thinking of using a 15 x 5" US Mags wheel on a custom made hub, like this:
Going for that old school hot rod look, seems appropriate.
Cheers!
-
russelllowe
- Posts: 252
- Joined: Mon Jan 06, 2014 2:21 pm
- Contact:
Re: theTRUTH
Hi All,
Getting started on the slippery bits. Step one, make a LSR "fender" (mud guard doesnt seem appropriate, and salt guard could be anywhere).
This is the top; sides, bottom lip to wrap under and mounting points next:
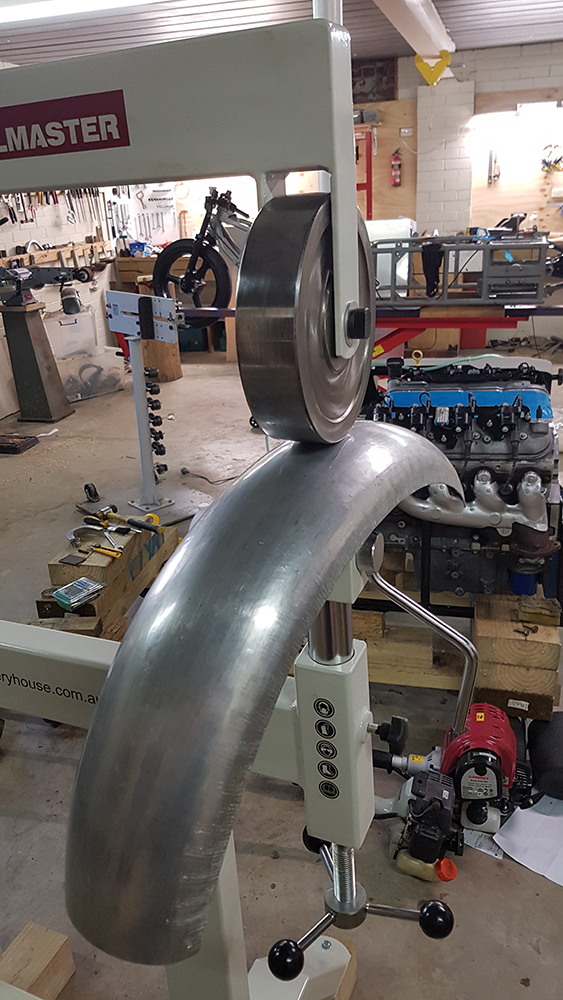
I'm using one of these to check the consistency of the profile (along its length and for symmetry), but in terms of a buck this is as close as it gets:

I will have to build some kind of buck for the main fairing. I'm tending towards a wire buck because they are easy to see through, and cheap. Let me know if you have a preference and why ... and any other tips you have re shaping large fairings in Aluminium.
Cheers
Getting started on the slippery bits. Step one, make a LSR "fender" (mud guard doesnt seem appropriate, and salt guard could be anywhere).
This is the top; sides, bottom lip to wrap under and mounting points next:
I'm using one of these to check the consistency of the profile (along its length and for symmetry), but in terms of a buck this is as close as it gets:
I will have to build some kind of buck for the main fairing. I'm tending towards a wire buck because they are easy to see through, and cheap. Let me know if you have a preference and why ... and any other tips you have re shaping large fairings in Aluminium.
Cheers
Re: theTRUTH
mmmmmmmm
have i got a job for you

have i got a job for you


harky
DLRA #643
so far 120mph for$2000---imagine how fast I can go for $20,000
DLRA #643
so far 120mph for$2000---imagine how fast I can go for $20,000
-
russelllowe
- Posts: 252
- Joined: Mon Jan 06, 2014 2:21 pm
- Contact:
Re: theTRUTH
hey Harky,
Need some shapes?
Progress on the fender sides:
The small bits on the top edges will probably be the trickiest to do ... I started making one side, which fit better on the opposite side and then I trimmed to much off it ... so starting over.
Cheers!
Need some shapes?
Progress on the fender sides:
The small bits on the top edges will probably be the trickiest to do ... I started making one side, which fit better on the opposite side and then I trimmed to much off it ... so starting over.
Cheers!
-
russelllowe
- Posts: 252
- Joined: Mon Jan 06, 2014 2:21 pm
- Contact:
Re: theTRUTH
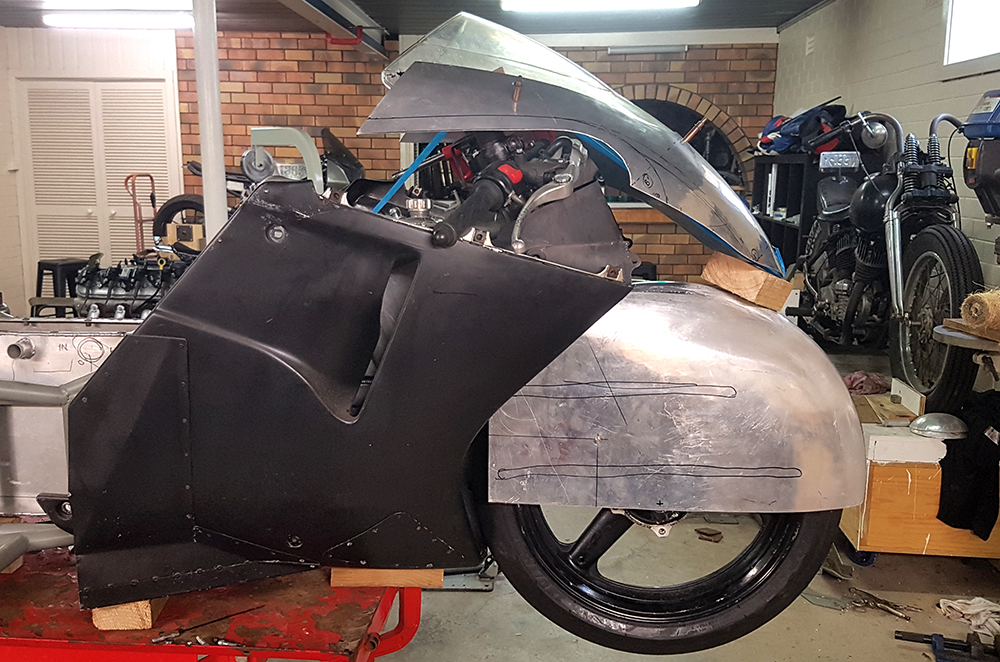
Hi Guys,
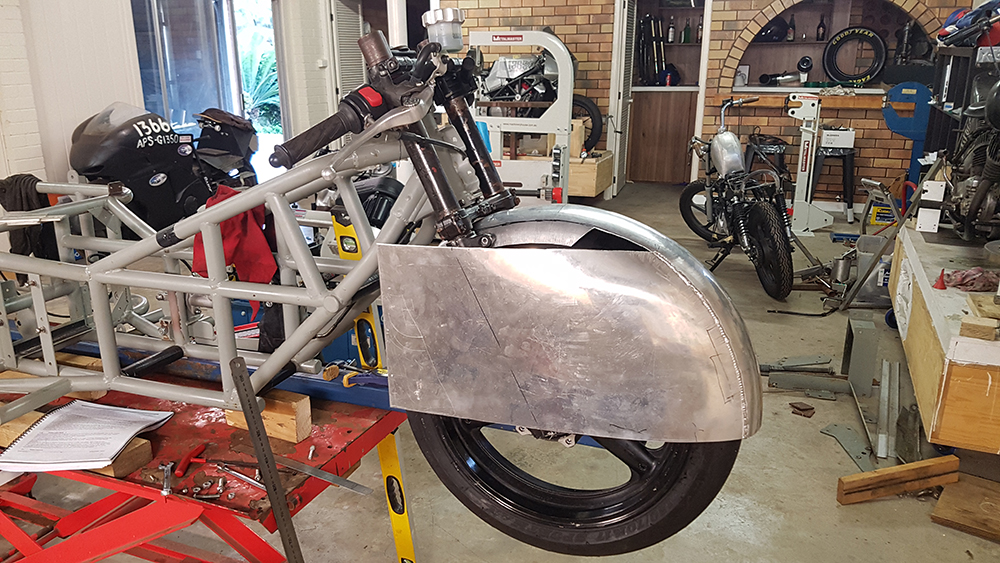
Some progress on the fairing. Basing it on a Honda Blackbird fairing because they are supposed to be pretty slippery, and I had one kicking around (from Paul's MPSG-1350 bike which has done 186mph on a stock motor thats done about 60,000km ... which testifies to how slipery they are).
The following is a step by step ... I'm nowhere near an expert on this stuff, but I have watched about 1.5 million hours of videos on Instagram and YouTube so I'm not exactly a beginner either ... please chip in with any tips and tricks.
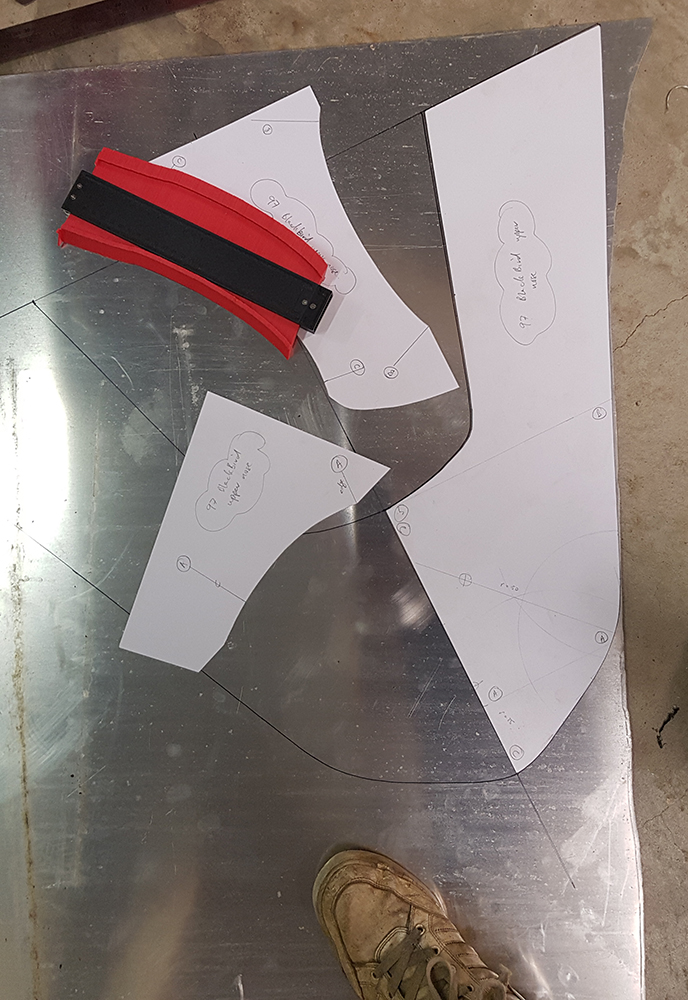
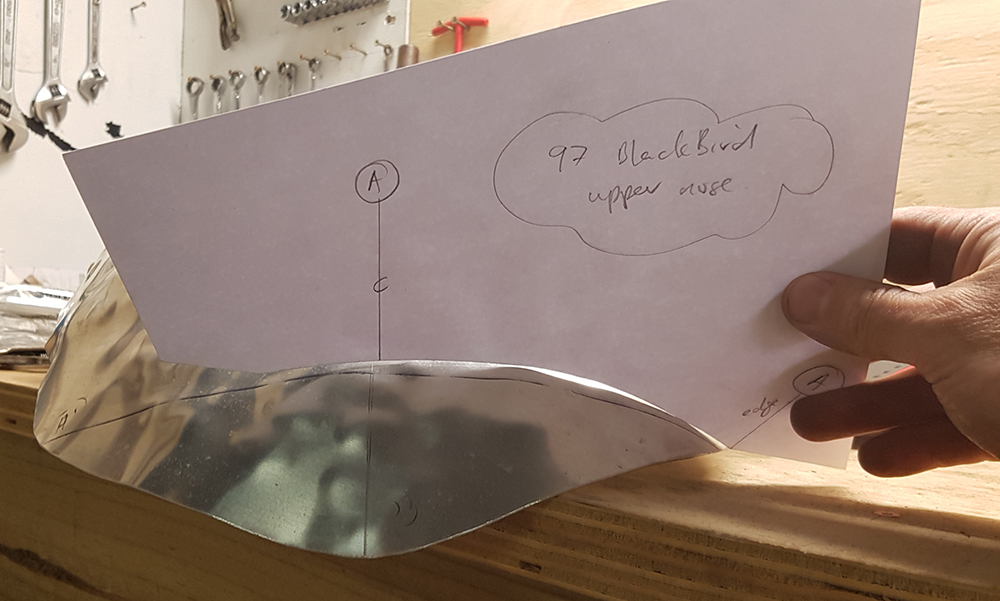
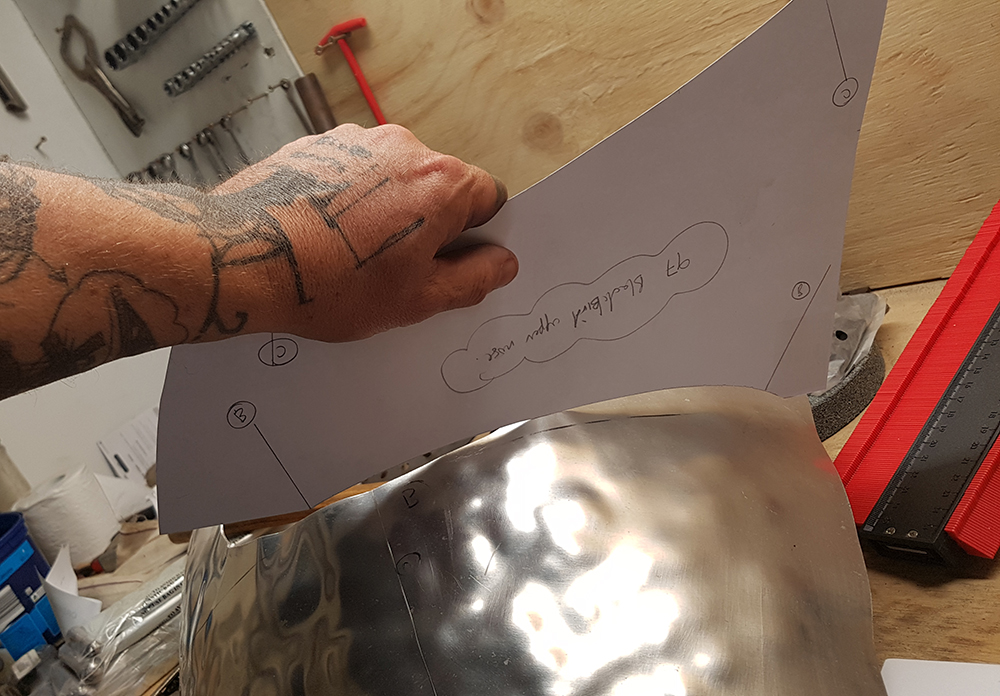
Step one was to create some patterns ... I used 250gsm paper from office works because it was the thickest they had, and captured the curves with the countour gauge thing I used with the front fender. I'm trying a new technique (following a guy called evan.wilcox on Instagram) where I cut the pattern out exactly to the line, with no excess, in the hope that it will help me keep things more symetrical.
After 10 minutes of blocking out (using a teardrop shaped nylon mallet on a sand bag) it was matching the countour gauges pretty well ...

And across ways ...
So then it's into the English Wheel ... I love how shit it looks at this point, most people would say I'd ruined a perfectly nice sheet of Aluminium...
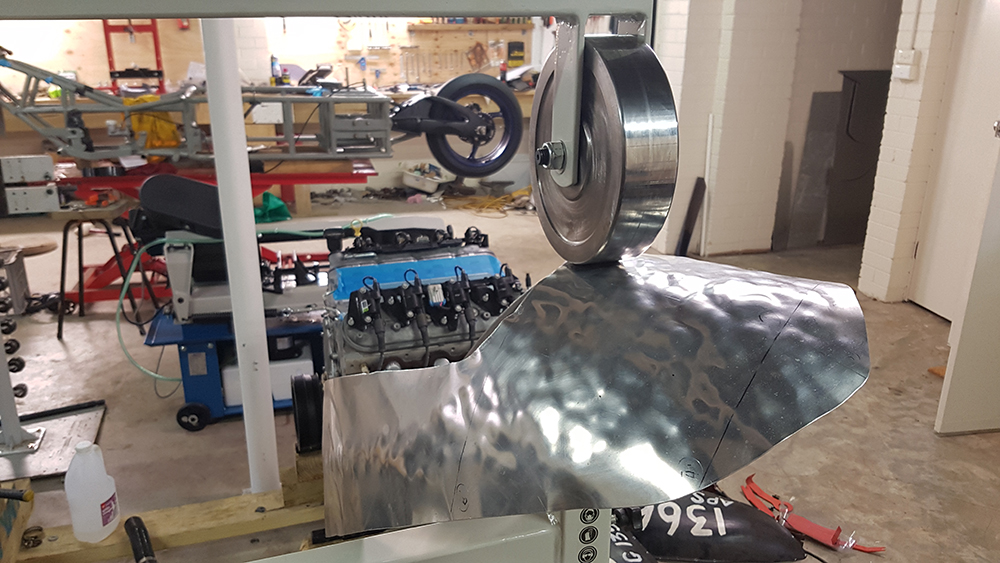
But 15 minutes (seriously, 15 minutes) later it looks like this ...
It'll probably take another hour or so of wheeling to get it to fit the gauges and the standard Blackbird windscreen spot on. I'll also lay it down a bit more, about 3" at the back, but it gives you an idea where I'm going.
Then onto the lower parts ... I'll wait until the big roll of pattern paper I ordered gets delivered before I get onto those though ... the A2 sized paper from OfficeWorks is too small, and too expensive, to figure out a panel this size.
As always, any coments or advice appreciated.
Cheers
Some progress on the fairing. Basing it on a Honda Blackbird fairing because they are supposed to be pretty slippery, and I had one kicking around (from Paul's MPSG-1350 bike which has done 186mph on a stock motor thats done about 60,000km ... which testifies to how slipery they are).
The following is a step by step ... I'm nowhere near an expert on this stuff, but I have watched about 1.5 million hours of videos on Instagram and YouTube so I'm not exactly a beginner either ... please chip in with any tips and tricks.
Step one was to create some patterns ... I used 250gsm paper from office works because it was the thickest they had, and captured the curves with the countour gauge thing I used with the front fender. I'm trying a new technique (following a guy called evan.wilcox on Instagram) where I cut the pattern out exactly to the line, with no excess, in the hope that it will help me keep things more symetrical.
After 10 minutes of blocking out (using a teardrop shaped nylon mallet on a sand bag) it was matching the countour gauges pretty well ...
And across ways ...
So then it's into the English Wheel ... I love how shit it looks at this point, most people would say I'd ruined a perfectly nice sheet of Aluminium...
But 15 minutes (seriously, 15 minutes) later it looks like this ...
It'll probably take another hour or so of wheeling to get it to fit the gauges and the standard Blackbird windscreen spot on. I'll also lay it down a bit more, about 3" at the back, but it gives you an idea where I'm going.
Then onto the lower parts ... I'll wait until the big roll of pattern paper I ordered gets delivered before I get onto those though ... the A2 sized paper from OfficeWorks is too small, and too expensive, to figure out a panel this size.
As always, any coments or advice appreciated.
Cheers


-
gennyshovel

- Posts: 866
- Joined: Tue Mar 29, 2005 10:10 am
- Location: Broken Hill
Re: theTRUTH
Very interesting work Russell, looking forward to seeing it for real on the salt 
First Australian to ride a motorcycle over 200mph at Bonneville,,,
-
russelllowe
- Posts: 252
- Joined: Mon Jan 06, 2014 2:21 pm
- Contact:
Re: theTRUTH
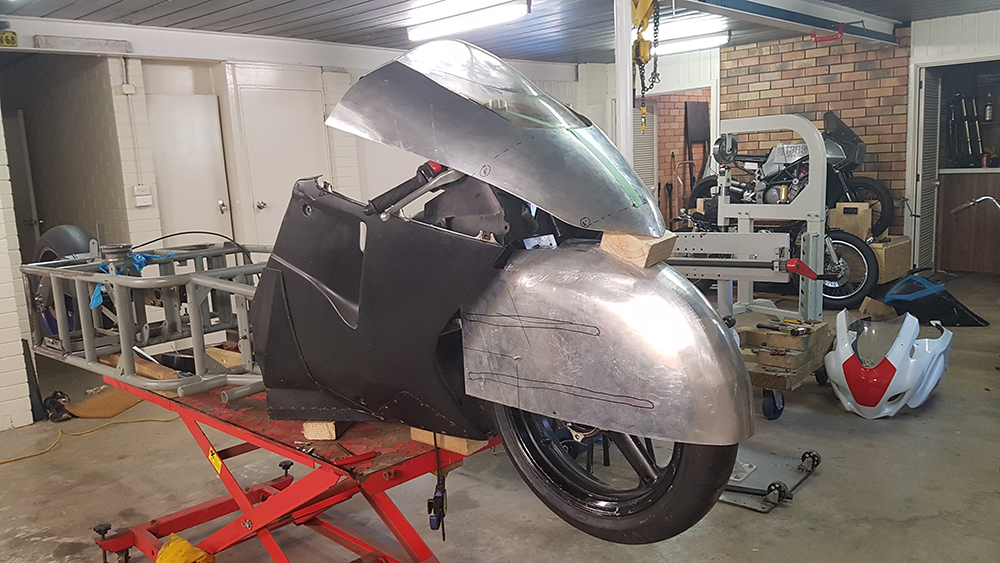
Hi Guys,
Thanks for the feedback, I'm enjoying the process (even though at one point today I thought "you really don't have a clue what you are doing do you?").
I got the fairing matching up with the front to back gauge and the standard windscreen ok ... but I over developed the shape side to side just below the windscreen so that doesn't match up with the Blackbird very well. It's symetrical though, so that will do. It took probably 3 hours with at least another hour to go for final smoothing ... so a bit more than the 1 hour predicted.
Here it is in elevation.
I have a few ideas about fairing my hands in ... I've enclosed right up to my elbows in the past and it felt pretty claustrophobic so I think I'll stop those bits before they get to my hands ... you can see the top part of the cutout for steering lock; the blister part won't follow that line exactly, it'll be a bit pointier at the front, maybe drooping down a bit too.
Cheers